Ghost Mannequin Photography: Studio Method, Costs & AI

Prateek Gupte
Last updated 4 November 2026.
Ghost mannequin photography is a way of shooting clothes so they look worn by an invisible person. The garment keeps its 3D shape, the neckline and sleeves look filled, and no model or mannequin is visible. It’s done by photographing the piece on a mannequin, shooting the inside of the neck separately, and combining the two in editing. Today an AI tool can also do it from a photo you already have.
Picture a Thursday drop with 40 new styles. You have a model shoot for the hero looks, but the PDP needs clean, consistent product shots for every SKU, and the retoucher quotes 15 minutes a garment. That’s where the ghost mannequin effect earns its place. It’s the cleanest way to show cut and construction without the cost of putting every piece on a person.
You probably already know the look. This guide covers how to produce it well: the studio method, garment prep, the fixes for problems that show up in every shoot, when to choose flat lay or on-model instead, what it costs, and the AI shortcut. Want to skip straight to the fast route? See how Image to Ghost turns on-model photos into ghost mannequin packshots.
Key Takeaways
Ghost mannequin photography takes at least two shots per view (garment on the mannequin, then the inside neck or back) blended in Photoshop. Retouching runs about 10–20 minutes per garment.
Studio ghost mannequin images typically cost \$20–\$75 each. An AI tool like Caimera’s Image to Ghost works out to roughly \$0.99 per catalog image on the Pro plan billed annually.
Ghost mannequin suits structured tops, jackets, dresses and outerwear. Flat lay suits accessories, kidswear and knits that lose shape. On-model is still best for fit-led and premium categories.
Most failures come from prep, not editing: wrong mannequin size, unsteamed fabric, flat sleeves and a missing neck shot.
Check every ghost image against the real garment for color, print placement, logos and proportions before it goes live.

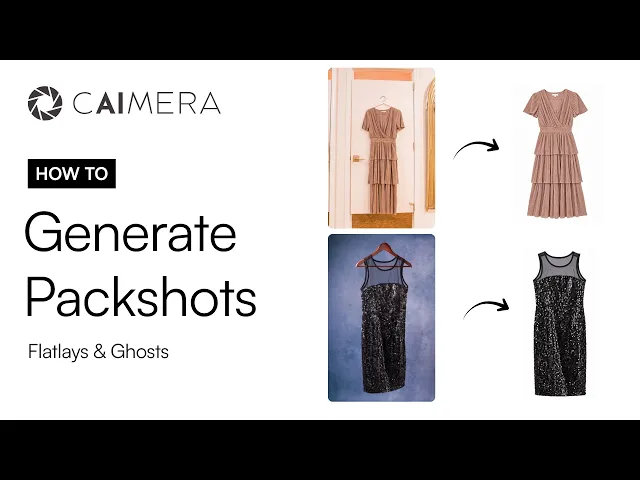
The same garments as clean product packshots and on a model: two of the three formats this guide compares.
What is ghost mannequin photography?
Ghost mannequin photography (also called invisible mannequin photography, the hollow man effect or 3D ghost) presents a garment in its worn shape with nothing inside it. Shoppers see the silhouette, the drape, the inside of the collar and often the label. They don’t see a body or a plastic form.
The look became standard in fashion e-commerce because it sits between two older formats. A flat lay is cheap but shows clothes as flat shapes. A model shot shows fit but costs a lot and pulls attention toward the person. The ghost mannequin effect keeps the product in focus and still shows shape, which is why most marketplaces and wholesale line sheets lean on it.
In continental Europe you’ll often hear the broader term “packshot” for this kind of clean product image. A ghost mannequin packshot is one style within that category. For a short definition, see the ghost mannequin glossary entry.

A ghost mannequin packshot: the blouse holds a worn shape with no visible mannequin.
How ghost mannequin photography works in the studio
The traditional method relies on a special mannequin and some careful compositing. Here’s the process most studios follow.
1. Use a mannequin with removable parts
Ghost mannequins have detachable chest plates, necks and arms. Removing the neck piece lets you see the inside of the collar, and removing the arms lets sleeves hang naturally. Pick a form that matches your sample size. A size 8 dress on a size 4 form looks limp, and on a size 12 form the seams strain.
2. Shoot the front (and back) on the mannequin
Dress the mannequin and style the garment: buttons done, collar set, hem straight. Shoot the front with the camera at chest height and level, so the garment doesn’t look tapered. Repeat for the back view if you need one. Lock the camera on a tripod and keep the lighting identical across every shot.
3. Shoot the inside: the neck joint
This is the step that makes the effect. Take the garment off, turn it inside out (or pin the back neck to a foam board), and photograph the inner back collar and label from the same angle. For pants and skirts, shoot the inside of the waistband the same way.
4. Combine the shots in Photoshop
In editing, mask out the mannequin from the front shot. Then place the inner-neck shot behind the collar so the garment looks hollow but full. Clean up the edges, remove dust and lint, match the color to the sample, and place it on a white or light gray background. This compositing step is where most of the time goes.
Want to watch it done? BidPixel’s tutorial is one of the clearest walkthroughs of the shoot and the edit:
Watch BidPixel’s ghost mannequin tutorial on YouTube
For another studio take, BigCommerce has a solid ghost mannequin photography primer.
How to prepare clothing for ghost mannequin photos
Most bad ghost images trace back to prep, not to the edit. Ten minutes per garment here saves twenty in Photoshop.
Steam everything. Wrinkles that look minor in person turn into hard shadows under studio lights.
Match the sample to the form. If the size is off, pad the mannequin with tissue or foam rather than pinning the fabric tight.
Pin from behind. Use clips at the back to take in excess fabric on the front view. Move them before you shoot the back.
Fill the sleeves. Use tissue paper or the mannequin’s arms so sleeves have volume and fall at a natural angle.
Remove tags and stickers that won’t be on the shopper’s piece. Keep the brand label if it’s part of your inner-neck shot.
Lint-roll and check the hardware. Zips closed or deliberately open, buttons aligned, drawstrings even.
Light it evenly. Two softboxes at 45 degrees plus a background light is the usual setup. Shoot a gray card so you can match color later.
Here’s a typical example. A womenswear label audits its PDP returns and finds “color not as pictured” is the top reason on a run of rust-colored linen shirts.
The shots are technically clean. But they were white-balanced against the white backdrop, not a gray card, so the rust reads as brick. Reshooting one shirt with a gray card gives a reference that fixes the whole batch’s color in an afternoon.
Common ghost mannequin problems and how to fix them
Problem | Likely cause | Fix |
Sleeves hang flat or twisted | No arms or stuffing; sleeves pinned to the body | Add tissue or the mannequin arms; angle sleeves 10–20 degrees out from the body |
Neckline looks pinched or stretched | Wrong neck-plate size, or the neck shot was taken at a different angle | Match the plate to the collar; shoot the inner neck from the same camera height |
A visible “seam” where the shots meet | Different lighting or color between front and neck shots | Lock the lights and white balance; feather the mask and match the inner shot’s levels |
Hard shadows inside the garment | Single light source, or the garment is too close to the backdrop | Add a fill light; pull the mannequin forward from the background |
Garment looks boxy or misshapen | Mannequin too large or too small | Choose the right size form; pad with foam rather than pinning |
Colors look off on the PDP | No gray card; edited on an uncalibrated screen | Shoot a gray card every session; edit on a calibrated monitor |
Inconsistent look across SKUs | Camera height, framing or crop changing between products | Fix the tripod position and use one crop template for the whole catalog |
Flat lay vs ghost mannequin vs on-model: which should you use?
Ghost mannequin isn’t always the right answer. Most strong product pages mix formats. Here’s how the three compare.
Flat lay: the garment laid flat and shot from above. Cheapest and fastest, no mannequin needed. Shows color, print and details, but not shape or fit. See the flat lay glossary entry.
Ghost mannequin: the garment in its worn shape with no body. Shows silhouette and construction, stays neutral and consistent across a catalog. Costs more than flat lay because of the compositing.
On-model: the garment on a person. Shows fit, drape, scale and how to style it, and usually converts best. It’s also the most expensive and slowest to produce. See on-model photography.

Which format works best by garment category
Category | Best primary format | Add as a secondary | Why |
Shirts, tees, blouses | Ghost mannequin | On-model | Collar and shape matter; one on-model shot shows fit |
Jackets and outerwear | Ghost mannequin | On-model, detail shots | Structure is the selling point |
Dresses | On-model | Ghost mannequin | Drape and length are hard to judge without a body |
Jeans and trousers | On-model | Ghost or flat lay | Fit is the main purchase question |
Knitwear | Flat lay or ghost | On-model | Knits stretch on forms; flat lay shows stitch clearly |
Swimwear and lingerie | On-model | Flat lay | Platforms and shoppers expect worn shots |
Kidswear | Flat lay | Ghost mannequin | Small sizes are hard to style on forms |
Accessories, scarves, socks | Flat lay | Lifestyle | No body shape to show |
How budget, catalog size and brand affect the choice
If you’re launching 20 SKUs a season with a premium price point, put the money into on-model and use ghost shots for the back and detail views. If you’re running 500+ SKUs with weekly drops, ghost mannequin or flat lay for every SKU, plus on-model for bestsellers, is the realistic mix. Marketplaces like Amazon and Zalando favor clean, consistent product-only images for the main listing, which makes ghost mannequin a safe default there.
Not sure which mix you need? You don’t have to pick one shoot. Image to Ghost can return a ghost mannequin or a flat lay from the same upload, and Flatlay to Catalog turns that flat lay into on-model shots.
AI ghost mannequin: getting the effect without the shoot
AI ghost mannequin tools skip the mannequin, the neck shot and the compositing. You upload an image of the garment and get back a hollow, worn-shape packshot. The quality gap between tools is large, so it’s worth knowing what to look for.
Caimera’s Image to Ghost works like this:
Upload a flat lay, a mannequin shot or a photo with a model in it. Editorial, lifestyle and studio catalog images all work.
Set the output: ghost mannequin or flat lay. If the photo has several products, such as a full outfit in a lookbook frame, select which garments to extract.
Extract. You get a clean packshot that keeps the source aspect ratio and the garment’s details: collars, cuffs, zips, buttons, embroidery and print placement.
This is where it changes the economics. Most brands already have on-model or campaign imagery for every style. Turning those into ghost packshots means one shoot can feed both the lookbook and the PDP. Designers can also get a ghost mannequin render straight from a sketch with Sketch to Image, before the sample exists.
Picture a menswear brand with 180 active SKUs whose studio shoots every new style twice, once on a model and once on a ghost form, at roughly \$40–\$75 a ghost image plus a week of retouching.
With Image to Ghost, that brand could shoot only the model images for its next drop and have PDP packshots for every new style the same afternoon. Pieces like leather jackets would still go to a retoucher, because sheen needs a human eye.
AI still has limits. Sheer and heavily draped fabrics, sequins and deep pleats can come back simplified. Logos can soften, prints can shift, and fine knits can lose stitch definition.
Treat AI output like any retoucher’s work: review it before it ships. For garments where the detail is the product, a traditional shoot is still the safer choice.

Start from an on-model shot you already have and get separate garment packshots for the PDP.
How much does ghost mannequin photography cost?
Studio pricing for ghost mannequin product photography usually starts around $75 per image. Squareshot, for example, lists ghost mannequin clothing photography from $75 per image. Expect to pay more for rush delivery, back views and extra detail shots, and add sample shipping both ways.
Doing it in-house means buying a ghost mannequin with removable parts (a few hundred dollars per size), lighting and a camera. Then you pay for the retouching time, which is the real ongoing cost at 10–20 minutes a garment.
AI changes the per-image maths. On Caimera’s Pro plan billed annually (\$99 per user per month), a catalog image works out to roughly \$0.99. That’s why many brands now use AI for catalog volume and keep studio shoots for hero campaigns and tricky fabrics. A full breakdown of photography budgets for 25, 100 and 500 SKUs is in our guide to product photography costs.

Want to test it on your own catalog? Try Image to Ghost free with 20 credits on an on-model shot you already have.
Ghost mannequin quality checklist
Run every image through this before it goes live, whether it came from a studio, your in-house team or an AI tool.
Color matches the physical sample under daylight, checked against a gray card shot or swatch.
Print and pattern placement matches the garment, with stripes and checks aligned at seams.
Logos and labels are sharp and correctly spelled, with no softened or melted lettering.
Proportions look right: sleeve length, body length and neckline width match the spec sheet.
Construction details are present: every button, pocket, zip pull and topstitch.
Inner neck shows a believable interior with no gaps or doubled collars.
Edges are clean, with no halos or leftover mannequin.
Background is consistent (pure white or your brand gray) and meets marketplace specs.
Framing matches your crop template so the grid looks uniform on category pages.
File is exported at the size your platform needs (Shopify recommends 2048 × 2048 px for square product images).
FAQ
What is ghost mannequin photography?
Ghost mannequin photography is a product photography technique that makes clothing look worn by an invisible person. The garment is shot on a mannequin, the inside of the neck is shot separately, and the images are combined so the mannequin disappears and the garment keeps its 3D shape.
What’s the difference between a ghost mannequin and an invisible mannequin?
Nothing, for most purposes. “Invisible mannequin” is another name for the same effect, and some studios use it to mean a mannequin with removable parts. Both terms describe the hollow, worn-shape product image.
Is ghost mannequin better than flat lay?
It depends on the product. Ghost mannequin is better for structured garments where shape sells, such as shirts, jackets and outerwear. Flat lay is better for accessories, kidswear and knits, and is cheaper to produce.
Many brands use both. The invisible mannequin glossary entry covers the terms in brief.
Can I do ghost mannequin photography without a mannequin?
Yes. Some photographers use a model and remove them in editing, or stuff the garment with tissue on a hanger. The faster option is an AI ghost mannequin tool, which creates the effect from a flat lay or on-model photo you already have.
Which app is best for ghost mannequin photos?
For a single listing, general photo editors like Photoroom have a ghost mannequin feature. For a fashion catalog, use a tool built for apparel that keeps garment details intact and handles volume. Caimera’s Image to Ghost turns on-model, lifestyle or catalog photos into ghost mannequin or flat lay packshots and can extract several garments from one image.
Are ghost mannequin images allowed on Amazon and other marketplaces?
Yes. Ghost mannequin images on a pure white background are widely used for main apparel images on Amazon, and they also suit Shopify, Zalando and ASOS. Always check each marketplace’s current image rules, since requirements vary by category.
Getting ghost mannequin photography right
Ghost mannequin photography is still the cleanest way to show a garment’s shape without the cost of a model on every SKU. The studio method works when the prep is disciplined: the right-size form, steamed fabric, a matched neck shot and one lighting setup for the whole catalog. AI now handles most of that work from photos you already have, which leaves your team’s time for the checks that protect returns and trust.
Use ghost mannequin for structure, flat lay for small items and knits, and on-model where fit decides the sale.
Prep beats retouching, every time.
Check color, print, logos and proportions against the real sample before publishing.
Use AI for catalog volume, and keep the studio for hero pieces and tricky fabrics.
Floafers grew conversions by 60% after moving its product imagery to AI. Try Image to Ghost free with 20 credits, or see pricing for team plans (Pro is \$99 per user per month billed annually).